• How to Recover an Out of Sync Mariadb Galera OpenStack Database cluster

    MariaDB-Seal-with-Text

    Introduction

    This process can be used whenever your databases are out of sync. For example when someone without thinking reboots all nodes in a cluster without shutting down the databases first.

    Resolution

    Place all cluster hosts into standby mode and cleanup any failed resources.

    I sugguest making a back-up of Mariadb on each controller nodes – just in case.

    root@controler3#  mysqldump --all-databases > mariadb_dump_06152015
    root@controller3 # pcs cluster standby --all
    root@controller3 # pcs status
    root@controller3 # pcs resource cleanup ${resource}

    Then on each Controller Node – verify that mariadb (mysql) has stopped. If any instance has not stopped properly via PCS as shown below, please stop them manually.

    # systemctl status mariadb.service
    mariadb.service - MariaDB database server
       Loaded: loaded (/usr/lib/systemd/system/mariadb.service; disabled)
       Active: inactive (dead)

    Find the latest (i.e – largest) version of the DB (seqno), or choose a node if all have the same version. In my instance, controller3 had the largest/highest version number, so we will be doing most of our recovery work on the instance below.

    root@controller3 # cat /var/lib/mysql/grastate.dat
    # GALERA saved state
    version: 2.1
    uuid:    2fb3bbe0-eed6-11e4-ac79-4b77a337d598
    seqno:   12175047
    cert_index:


    Stop puppet if it is running and edit the /etc/my.cnf.d/galera.cnf file. If you are not running puppet, or if puppet is not managing your Galera cluster you can skip this step and go ahead and edit the file.

    root@controller3 # systemctl stop puppet

    Set wsrep_cluster_address manually in /etc/my.cnf.d/galera.cnf making a note of the original value and restart mariadb manually.

    For example, your default configuration should look something like what is shown below. Each IP address listed is the IP address of a mariadb instance in your cluster.

    # Group communication system handle
    wsrep_cluster_address="gcomm://172.17.9.23,172.17.9.24,172.17.9.22"

    Modify to this by commenting out the default string and adding the string shown in the example below. Note that in this example we are working on controller3.

    # Group communication system handle
    #wsrep_cluster_address="gcomm://172.17.9.23,172.17.9.24,172.17.9.22"
    wsrep_cluster_address="gcomm://"

    Now restart Mariadb manually on the controller3.

    root@controller3 # systemctl start mariadb

    Now start mariadb on one of the remaining controllers

    root@controller2 # systemctl start mariadb

    Below you can see the newly started Maridb instance as requested to sync

    Jun 15 10:08:02 controller2 mysqld_safe[24999]: 150615 10:08:02 mysqld_safe Logging to '/var/log/mariadb/mariadb.log'.
    Jun 15 10:08:02 controller2 mysqld_safe[24999]: 150615 10:08:02 mysqld_safe Starting mysqld daemon with databases from /var/lib/mysql
    Jun 15 10:08:02 controller2 mysqld_safe[24999]: 150615 10:08:02 mysqld_safe WSREP: Running position recovery with --log_error='/var/lib/mysql/wsr...ver.pid'
    Jun 15 10:08:04 controller2 mysqld_safe[24999]: 150615 10:08:04 mysqld_safe WSREP: Recovered position 2fb3bbe0-eed6-11e4-ac79-4b77a337d598:12175047
    Jun 15 10:08:06 controller2 systemd[1]: Started MariaDB database server.


    Once running you can un-standby the nodes and monitor the status as the remaining resources are loaded.

    root@rcontroller3 # pcs cluster unstandby --all
    root@node # pcs status

    Finally, correct the value of wsrep_cluster_address to it’s original value in /etc/my.cnf.d/galera.cnf and restart the service, monitoring that the resource remains active.

    root@controller3 # vi /etc/my.cnf.d/galera.cnf
    root@controller3 # systemctl restart mariadb
    root@controller3 # pcs status

    Now check your databases to make sure that they are in sync. The following file should be the same on each controller.

    [root@lppcldiuctl01 ~(openstack_admin)]# cat /var/lib/mysql/grastate.dat
    # GALERA saved state
    version: 2.1
    uuid:    2fb3bbe0-eed6-11e4-ac79-4b77a337d598
    seqno:   -1
    cert_index:

    Reference:
    https://access.redhat.com/solutions/1283463

  • OpenStack: How to Remove RabbitMQ Durable Queues

    hero_thumb1

    Introduction

    This error you can see in multiple places, one being the logs for rabbitmq. The second being /var/log/cinder/volume.log

    The tail statement below is very helpful for finding errors in OpenStack.

    tail -fn0 /var/log/{nova,cinder,glance}/*.log | egrep 'ERROR|TRACE|WARNING'

    Documented Errors:

    EXAMPLE 1:

    oslo.messaging._drivers.impl_rabbit PreconditionFailed: Exchange.declare: (406) PRECONDITION_FAILED - cannot redeclare exchange 'openstack' in vhost '/' with different type, durable, internal or autodelete value

    EXAMPLE 2:

    2015-06-08 09:52:17.367 8437 ERROR oslo.messaging._drivers.impl_rabbit [-] Failed to declare consumer for topic 'cinder-scheduler': Queue.declare: (406) PRECONDITION_FAILED - parameters for queue 'cinder-scheduler' in vhost '/' not equivalent

    Warning

    Note that you need to make sure that you are only working with OpenStack specific queues.

    Cause

    This is caused by a mismatch in the durable queues setting in the configuration files on the controller nodes. You cannot just change this setting to correct the issue, you must manually delete the affected queues.

    Resolution

    # pcs resource unmanage mysqld
    # pcs resource unmanage rabbitmq-server
    # pcs cluster standby --all
    # curl http://localhost:15672/cli/rabbitmqadmin > rabbitmqadmin
    # chmod +x rabbitmqadmin
    # ./rabbitmqadmin help subcommands
    # rabbitmqctl list_queues

    The ccommand above will give you a list of all the queues, so now you can search for the affected queue and delete it as shown. In this example I am deleting the queue “notifications.info”.

    [root@lppcldiuctl01 ~(openstack_admin)]# ./rabbitmqadmin --username=openstack --password=81d86697132a45a55 delete queue name=notifications.info
    queue deleted

    If you have multiple queues affected you can run through several at a time as shown below.

    # rabbitmqctl list_queues | awk '{print $1}' > queues
    # vim queues
    # cat /etc/rabbitmq/rabbitmq.config
    # ./rabbitmqadmin --username=openstack 
    --password=81d86697132a45d9832d7fb35d168a55 delete queue 
    name=reply_ea13ffaf100de1baca
    # for q in $(<queues); do ./rabbitmqadmin --username=openstack 
    --password=81d8669713 delete queue name=$q; done

    Now bring everything back online

    # pcs cluster unstandby --all

    Now re-managed the services that you unmanaged above.

    # pcs resource manage mysqld
    # pcs resource manage rabbitmq-server

    Note that the documentation above can be modified to delete exchanges as well as queues. More information on exchanges below.

    https://www.rabbitmq.com/tutorials/amqp-concepts.html

  • A Simple How To Guide for TMUX

    brightknight-tux-hatches-3796

    TMUX is a terminal multiplexer, a command line tool for enabling time travel, and a utility that can be utilized for safe trans-dimensional travel. Note, however, that only the first part of that last sentence is actually true.

    The purpose of this post is not to teach you (or me) how to become TMUX experts, rather we are just going to learn how to do a few simple, yet very useful things that I feel are the best features of TMUX

    Creating your TMUX Config File

    First you need to install tmux via your favorite package installer. Next, you can drop this .tmux.conf profile in your home directory. Don’t forget to source it. This file was given to me by a fellow co-worker and seems to make tmux pretty and functional.

    This .tmux.conf sets your bind-key to “ctrl-A”. From here on out we will refer to this as our bind-key

    
    #.tmux.conf in home directory
    
    set -g prefix C-a
    
    #bind C-c run &quot;tmux show-buffer | xclip -i -selection clipboard&quot;
    bind C-c run &quot;tmux show-buffer | xclip -i -selection primary&quot;
    
    bind-key C-a last-window
    bind-key a send-key C-a
    #bind-key M-a send-prefix
    
    bind-key h select-pane -L
    bind-key ^H select-pane -L
    bind-key k select-pane -U
    bind-key ^K select-pane -U
    bind-key j select-pane -D
    bind-key ^J select-pane -D
    bind-key l select-pane -R
    bind-key ^L select-pane -R
    
    bind-key J resize-pane -D 5
    bind-key K resize-pane -U 5
    bind-key H resize-pane -L 5
    bind-key L resize-pane -R 5
    
    bind-key S setw synchronize-panes
    
    #set-option -g lock-command '/usr/bin/vlock'
    set-option -g lock-after-time 300
    bind-key X lock-client
    
    # vi ftw
    set-window-option -g mode-keys vi
    
    # bind-key N new-session
    # Enhanced new-session: set session name
    bind-key N command-prompt -p name: &quot;new-session -s %1&quot;
    
    #### COLOR (Solarized dark)
    # default statusbar colors
    set-option -g status-bg black #base02
    set-option -g status-fg yellow #yellow
    set-option -g status-attr default
    
    # default window title colors
    #set-window-option -g window-status-fg brightblue #base0
    #set-window-option -g window-status-bg default
    #set-window-option -g window-status-attr dim
    
    # active window title colors
    #set-window-option -g window-status-current-fg brightred #orange
    #set-window-option -g window-status-current-bg default
    #set-window-option -g window-status-current-attr bright
    
    # pane border
    #set-option -g pane-border-fg black #base02
    #set-option -g pane-active-border-fg brightgreen #base01
    
    # message text
    #set-option -g message-bg black #base02
    #set-option -g message-fg brightred #orange
    
    # pane number display
    #set-option -g display-panes-active-colour blue #blue
    #set-option -g display-panes-colour brightred #orange
    
    # clock
    #set-window-option -g clock-mode-colour green #green


    Split Window Panes

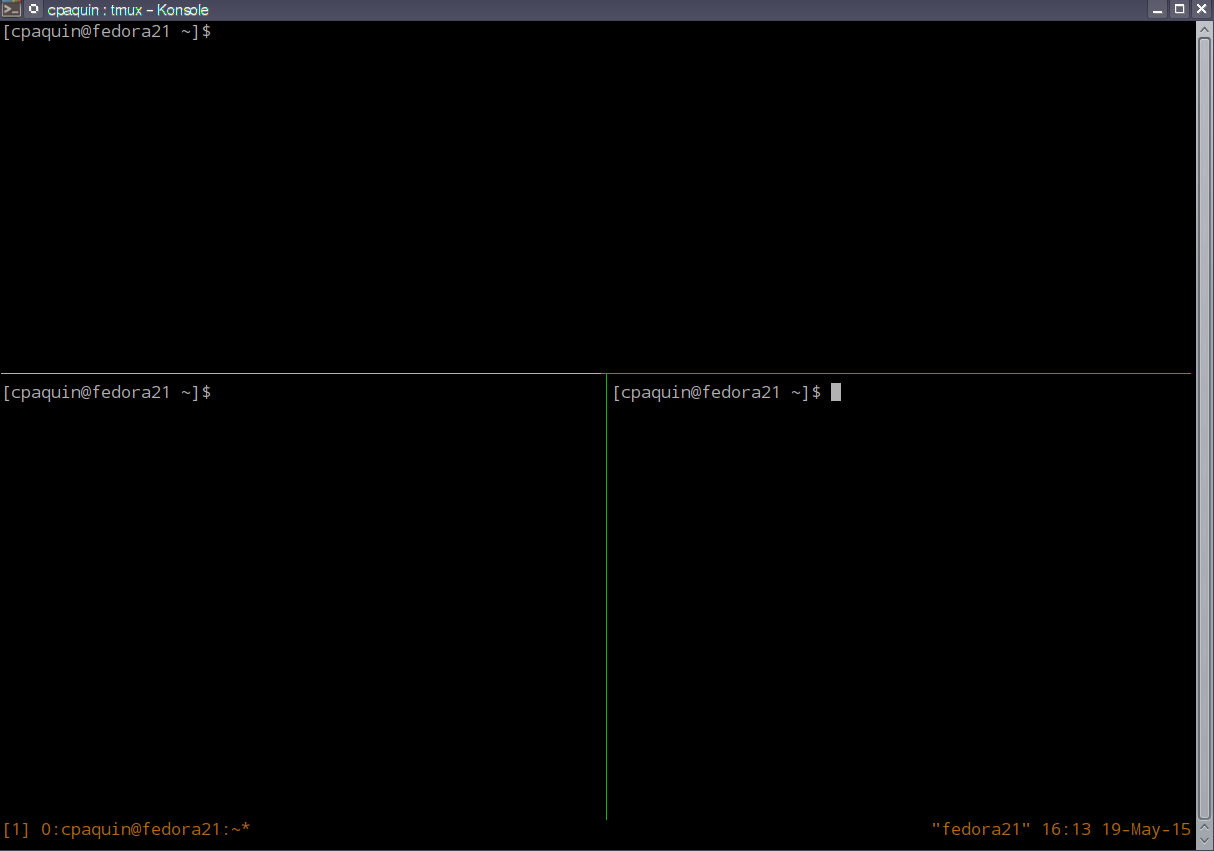
    This is my favorite feature of TMUX. Need to monitor several logs at once across multiple machines without having to switch back and forth between tabs or separate terminal windows, then you are in luck. See the screenshot below for an example of this. Here I have three separate windows.

    tmux


    To create a virtual split run the command below.

    Run the command below to split a screen vertically.

    <bind-key> %

    Run the command below to split a screen horizontally

    <bind-key> "

    Now that you have created a bunch of windows/panes you now need to move between them. Use the commands below to accomplish this.

    bind-key <UP ARROW>
    bind-key <DOWN ARROW>
    bind-key <RIGHT ARROW>
    bind-key <LEFT ARROW>

    To synchronize panes, run the command below. For example, let’s say I jump between the three panes in my example image above and ssh to separate servers. However I then want to “tail -f /var/log/secure” on each server, but I do not want to type the command three times. Instead, I sync my frames and run the command once. The command below accomplishes this.

    bind-key <S>

    To unsyncronize, run the command below.

    bind-key <S>

    Session Management

    TMUX operates very similarly to Screen when it comes to session management.

    The command below will create a new session called test_session.

    $ tmux new -s test_session

    To detach from the test session that you just created use the command below

    $ tmux detach d

    Now let’s re-attach to our test session.

    $ tmux attach -t test_session

    Ok, now after reattaching from our test session we create another session called test_session_2. See below.

    $ tmux new -s test_session_2

    Now let’s detach from our currently active session. Same detach command as shown a few steps above

    $ tmux detach d

    Now let’s list all our open TMUX sessions.

    $ tmux list-sessions
    test_session: 1 windows (created Wed May 20 13:28:34 2015) [125x33]
    test_session_2: 1 windows (created Wed May 20 13:33:35 2015) [125x33]

    Finally, we can switch between sessions with the switch command.

    $ tmux switch -t test_session

    Oh, let’s not forget, using the following command we can kill a session with the command below.

    $ tmux kill-session -t  test_session

    Also, note that you can detach and close an active session with <ctl> d.

  • OpenStack Nova: Get NoVNC Connection Info From the Command Line

    vampirebatTo access a novnc console in OpenStack without logging into the Horizon WebUi, follow the steps below.

    First and foremost you need to find your virtual instance. In this example I am looking for one of my test instances.

    # nova list | grep test

    Note that if you are logged in as root and the instance you are looking for was created under a guest tenant, then the command is a bit different. See below.

    # nova list –all-tenants | grep test

    The nova list command above can spew out a lot of information if you have many test instances. However this is the one that I am looking for specifically.

    2a5481e6-9210-4353-af8f-db49e052d5c6 | fatmin-test-1         | ACTIVE  | –          | Running     | fatmin_network=10.0.10.1

    Now grab the UUID from the first field above.

    # nova get-vnc-console 2a5481e6-9210-4353-af8f-db49e052d5c6 novnc

    This will spit out a URL as shown below.

    +——-+———————————————————————————–+
    | Type | Url |
    +——-+———————————————————————————–+
    | novnc | http://10.21.148.95:6080/vnc_auto.html?token=f27af916-94a0-4a96-85fd-7b74b0748ce1 |
    +——-+———————————————————————————–+

    Now copy and paste this into a browser window to access the console for your instance.

  • OpenStack Cinder – Add Additional Backend Volumes

    openstack

    On this standalone host we have just added an additional disk, which has been enumerated as “/dev/vdc”. First lets go ahead and create a partition on this disk and label it with the type “lvm”.

    [root@packstack cinder(keystone_admin)]# fdisk /dev/vdc

    Now lets view the partition that we created. Note that our new disk is approx 21gb in size. Since we are working in our lab, we are not working with large disks.

    [root@packstack cinder(keystone_admin)]# fdisk -l /dev/vdc1
    Disk /dev/vdc1: 21.5 GB, 21473787904 bytes, 41940992 sectors
    Units = sectors of 1 * 512 = 512 bytes
    Sector size (logical/physical): 512 bytes / 512 bytes
    I/O size (minimum/optimal): 512 bytes / 512 bytes

    Currently we have an existing cinder-volume group on this node. This volume group uses the default name of “cinder-volume”.

    [root@packstack cinder(keystone_admin)]# vgscan | grep cinder
    Found volume group "cinder-volumes" using metadata type lvm2

    Now lets run ‘pv-create’.

    [root@packstack cinder(keystone_admin)]# pvcreate /dev/vdc1
    Physical volume "/dev/vdc1" successfully created

    And lets create a new volume group. Remember “cinder-volumes” is already in use, so let’s make sure that we choose a unique name for our new VG.

    [root@packstack cinder(keystone_admin)]# vgcreate cinder-volumes-1 /dev/vdc1
    Volume group "cinder-volumes-1" successfully created

    Now we can add the following to the end of our cinder.conf

    [lvm1]
    volume_group=cinder-volumes-1
    volume_driver=cinder.volume.drivers.lvm.LVMISCSIDriver
    volume_backend_name=lvm1

    Now lets restart the cinder services.

    [root@packstack cinder(keystone_admin)]# systemctl | grep cinder | awk '{print $1}'| xargs -tn1 systemctl restart
    systemctl restart openstack-cinder-api.service
    systemctl restart openstack-cinder-backup.service
    systemctl restart openstack-cinder-scheduler.service
    systemctl restart openstack-cinder-volume.service

    Now lets make sure that cinder services are up and running.

    [root@packstack cinder(keystone_admin)]# systemctl | grep cinder | awk '{print $1}'| xargs -tn1 systemctl status | grep Active
    systemctl status openstack-cinder-api.service
    Active: active (running) since Tue 2015-04-28 17:02:29 EDT; 1min 21s ago
    systemctl status openstack-cinder-backup.service
    Active: active (running) since Tue 2015-04-28 17:02:29 EDT; 1min 21s ago
    systemctl status openstack-cinder-scheduler.service
    Active: active (running) since Tue 2015-04-28 17:02:29 EDT; 1min 21s ago
    systemctl status openstack-cinder-volume.service
    Active: active (running) since Tue 2015-04-28 17:02:30 EDT; 1min 20s ago

    Now we must declare the new volume as block storage using the commands below.

    [root@packstack cinder(keystone_admin)]# cinder type-create lvm1
    +--------------------------------------+------+
    | ID | Name |
    +--------------------------------------+------+
    | 082fc208-9d38-4ad4-ab48-110d056a2856 | lvm1 |
    +--------------------------------------+------+

    Now lets link the backend volume to the newly created type-key.

    [root@packstack cinder(keystone_admin)]# cinder type-key lvm1 set volume_backend_name=cinder-volumes-1

    Below you can see our new cinder backend volume, and its backend name.

    [root@packstack cinder(keystone_admin)]# cinder extra-specs-list
    +--------------------------------------+-------+-----------------------------------------------+
    | ID | Name | extra_specs |
    +--------------------------------------+-------+-----------------------------------------------+
    | 082fc208-9d38-4ad4-ab48-110d056a2856 | lvm1 | {u'volume_backend_name': u'cinder-volumes-1'} |
    | b775069f-7ecc-42e3-954a-553d5a5244a2 | iscsi | {u'volume_backend_name': u'lvm'} |
    +--------------------------------------+-------+-----------------------------------------------+

    Now lets create a new volume on the new backing volume.

    [root@packstack cinder(keystone_admin)]# cinder create --volume_type lvm1 --display_name test_multi_backend 1
    +---------------------+--------------------------------------+
    | Property | Value |
    +---------------------+--------------------------------------+
    | attachments | [] |
    | availability_zone | nova |
    | bootable | false |
    | created_at | 2015-04-28T21:15:57.552565 |
    | display_description | None |
    | display_name | test_multi_backend |
    | encrypted | False |
    | id | 57b7c382-caa6-4c21-8a79-00c661140e3c |
    | metadata | {} |
    | size | 1 |
    | snapshot_id | None |
    | source_volid | None |
    | status | creating |
    | volume_type | lvm1 |
    +---------------------+--------------------------------------+
  • Nova: Getting Started with the Openstack CLI

    NovaFig2Looking to get started with the nova command, well look no further. Here are a few simple commands that you can use to get started. Nothing fancy here, rather these commands serve as a basic introduction to nova command and the OpenStack CLI.

    Note that the following commands are all run on a standalone OpenStack install deployed via the PackStack installer. Not that this matters all that much, but it will explain the hostname of my controller/compute node.

    List all uploaded images. Here you can see that I only have one active image available via Glance.

    [root@packstack ~(keystone_admin)]# nova image-list
    +————————————–+————–+——–+——–+
    | ID                                                                 | Name          | Status | Server |
    +————————————–+————–+——–+——–+
    | b60448e9-48b8-4727-9cb8-415662ec3bf8 | Cirros-0.3.3 | ACTIVE | |
    +————————————–+————–+——–+——–+

    Show detailed information pertaining to a specific image.

    In this instance I am using the ID from the entry above.

    [root@packstack ~(keystone_admin)]#  nova image-show b60448e9-48b8-4727-9cb8-415662ec3bf8

    +———————-+————————————–+
    | Property                          | Value |
    +———————-+————————————–+
    | OS-EXT-IMG-SIZE:size | 13200896 |
    | created | 2015-04-14T22:02:17Z |
    | id | b60448e9-48b8-4727-9cb8-415662ec3bf8 |
    | minDisk | 0 |
    | minRam | 0 |
    | name | Cirros-0.3.3 |
    | progress | 100 |
    | status | ACTIVE |
    | updated | 2015-04-14T22:02:18Z |
    +———————-+————————————–+

    List all hypervisors in an OpenStack Cluster…

    [root@packstack ~(keystone_admin)]# nova hypervisor-list
    +—-+———————+
    | ID | Hypervisor hostname |
    +—-+———————+
    | 1   | packstack.local |
    +—-+———————+

    List all Flavors...

    [root@packstack ~(keystone_admin)]# nova flavor-list
    +—-+———–+———–+——+———–+——+——-+————-+———–+
    | ID | Name | Memory_MB | Disk | Ephemeral | Swap | VCPUs | RXTX_Factor | Is_Public |
    +—-+———–+———–+——+———–+——+——-+————-+———–+
    | 1 | m1.tiny | 512 | 1 | 0 | | 1 | 1.0 | True |
    | 2 | m1.small | 2048 | 20 | 0 | | 1 | 1.0 | True |
    | 3 | m1.medium | 4096 | 40 | 0 | | 2 | 1.0 | True |
    | 4 | m1.large | 8192 | 80 | 0 | | 4 | 1.0 | True |
    | 5 | m1.xlarge | 16384 | 160 | 0 | | 8 | 1.0 | True |
    +—-+———–+———–+——+———–+——+——-+————-+———–+

    Show additional information pertaining to a specific flavor.

    root@packstack ~(keystone_admin)]# nova flavor-show m1.tiny

    +—————————-+———+
    | Property | Value |
    +—————————-+———+
    | OS-FLV-DISABLED:disabled | False |
    | OS-FLV-EXT-DATA:ephemeral | 0 |
    | disk | 1 |
    | extra_specs | {} |
    | id | 1 |
    | name | m1.tiny |
    | os-flavor-access:is_public | True |
    | ram | 512 |
    | rxtx_factor | 1.0 |
    | swap | |
    | vcpus | 1 |
    +—————————-+———+

    List all running instances, regardless of tenant.

    Here you can see both the private ip address, and the public, floating ip address of each instance.

    [root@packstack ~(keystone_admin)]# nova list –all_tenants
    +————————————–+———–+——–+————+————-+————————————-+
    | ID | Name | Status | Task State | Power State | Networks |
    +————————————–+———–+——–+————+————-+————————————-+
    | 473170c0-c7b5-4da7-909a-682b14bba1ae | instance1 | ACTIVE | – | Running | Private=172.16.0.2, 192.168.122.201 |
    | 3c25fa8a-0476-40fd-9b27-f4c0c7082dc1 | instance2 | ACTIVE | – | Running | Private=172.16.0.4, 192.168.122.202 |
    +————————————–+———–+——–+————+————-+————————————-+

    Get detailed information on running instances.

    Note that this output is a bit ugly below. It will look better on your console.

    [root@packstack ~(keystone_admin)]# nova-manage vm list
    instance node type state launched image kernel ramdisk project user zone index
    instance1 packstack.local m1.tiny active 2015-04-14 22:08:24 b60448e9-48b8-4727-9cb8-415662ec3bf8 0254b6c215de43e697256fa27bcd3477 a2be9c15f7cd49a3afbfae3963cf0553 nova 0
    instance2 packstack.local m1.tiny active 2015-04-27 22:33:50 b60448e9-48b8-4727-9cb8-415662ec3bf8 0254b6c215de43e697256fa27bcd3477 a2be9c15f7cd49a3afbfae3963cf0553 nova 0

    For more information — take a look here.

  • Packstack Installer Failure: “Error: Could not start Service[rabbitmq-server]: Execution of ‘/usr/bin/systemctl start rabbitmq-server’ returned 1”

    openstack

    Sitting in my hotel room today, I kept running into this error while trying to install OpenStack on a RHEL 7.1 VM running on my laptop. Digging through logs was not helping me one bit, and neither was trying to run “puppet apply” on the failing puppet manifests to see if I could get more info with which to troubleshoot.

    Below is the specific error that I was running into. Note that my RHEL VM’s IP address is 192.168.122.75. This IP address is pre-pended to the puppet module names. Your output, will obviously, vary. Note that this output is truncated.

    Applying 192.168.122.75_amqp.pp
    Applying 192.168.122.75_mariadb.pp
    192.168.122.75_amqp.pp: [ ERROR ]
    Applying Puppet manifests [ ERROR ]

    ERROR : Error appeared during Puppet run: 192.168.122.75_amqp.pp
    Error: Could not start Service[rabbitmq-server]: Execution of ‘/usr/bin/systemctl start rabbitmq-server’ returned 1: Job for rabbitmq-server.service failed. See ‘systemctl status rabbitmq-server.service’ and ‘journalctl -xn’ for details.
    You will find full trace in log /var/tmp/packstack/20150415-183003-mn6Kfx/manifests/192.168.122.75_amqp.pp.log
    Please check log file /var/tmp/packstack/20150415-183003-mn6Kfx/openstack-setup.log for more information
    Additional information:

    Each and every time, the failure occurred when the installer was trying to install/start and rabbitmq-server via the puppet module amqp.pp. Attempting to start rabbitmq manually yielded the same result.

    In this instance, I was trying to be fancy and I had given my VM the hostname packstack01.local (instead of sticking with localhost).

    [root@packstack01 20150415-183254-Kv8u6k]# hostnamectl
    Static hostname: packstack01.local
    Icon name: computer
    Chassis: n/a
    Machine ID: ca64b7fb0c9d4459a4d313dd17b19d76
    Boot ID: fc3397657ed040fca72f3d229d014b74
    Virtualization: kvm
    Kernel: Linux 3.10.0-229.1.2.el7.x86_64
    Architecture: x86_64

    Fresh out of any good ideas, I noticed that a simple nslookup on my made up hostname actually returned results. Results that I would not have expected to be valid.

    [root@packstack01 20150415-183254-Kv8u6k]# nslookup packstack01.local
    Server: 192.168.1.1
    Address: 192.168.1.1#53

    Name: packstack01.local.local
    Address: 198.105.244.104
    Name: packstack01.local.local
    Address: 198.105.254.104

    Despite never referencing my made up hostname in my answer file (by default, the answer file is generated with IP addresses only)  the Rabbitmq service was attempting to connect to itself via hostname, which obviously failed as this is a valid ip and since I was working in a hotel room without proper dns, my server was trying to connect to a machine on the opposite side of the country.

    A quick bit of tinkering in the /etc/hosts file resolved this issue, and I was able to complete my install.

    Note that there are probably many other reasons why one might run into this error during an OpenStack install via Packstack, however this is the one that I ran into, and thankfully it was easy to fix.

    Note to self – always use localhost when working without a valid DNS entry.