• How to Add Users via the CLI to a Thinklogical Secure Console Server

    7050

    Since the Thinklogical Secure Console Server is running a variation of RedHat Linux, it is very tempting to try to add users via the command line using the useradd command as you normally would on a Linux machine. Please note that you probably do not want to do this for several reasons.

    First off your users will be unable to connect to any serial ports and possibly be unable to log into the webUI at all.

    So here is the first thing you need to know about adding users or changing passwords on the command line. Do not create any passwords over 10 characters. Do this, and your users will be unable to log into the webUI.

    Even worse, do this to your root account, and you have now locked yourself out of the web interface.

    Second thing to note is that if you use the useradd command your new user will not be have the correct permissions to connect to any of the managed serial ports.

    Instead, Thinklogical has created a wrapper script for useradd, called adduser. This custom command creates your user and adds it to the proper groups and required configuration file. When added properly each user ends up with their own config file in /etc/lsi/conf.

    In this example I created a user named “admin” using the add user command. In order to connect to serial ports you must be a member of the “scsusers” group. To monitor (or view) other user’s active connections, your user will need to be a member of the “monitor” group. Below you can see my new user’s group memberships.

    [root@scs config]# id admin
    uid=500(admin) gid=701(scsusers) groups=701(scsusers),702(monitor)

    Now even though my user id a member of the correct groups, I still need the a config file in /etc/lsi/conf. Since my userid is admin, my config file will be /etc/lsi/conf/admin.conf.

    ESCAPE_SEQ="\x1bA"
    BREAK_SEQ="\x1bB"
    ALLOW_CLEAR=1-48
    ALLOW_CONNECT=1-48
    ALLOW_MONITOR=1-48
  • Configure Syslog Logging Levels on the Asus RT-AC66U Router

    4614_WizardStressToy_1


    So here is a quick little one that I figured out the other day.

    Having just set up a Splunk server at home, I wanted to make sure that I was not going to hit the data limit of 500mb a day for the free version of Splunk. I figured out pretty fast that my ASUS RT-AC66U was a very chatty-cathy when it came to syslog… sending me all sorts of very raw data that I was, at least at first, not so sure I was interested in indexing. So I hit the cli and started poking around.

    First off, before we jump in, let’s make sure that we are all on the same page. First thing to note is that I am running the custom Merlin firmware, however that doubt that the stock firmware is much different. Second, let’s make sure that we all know how to configure syslog on our Asus.

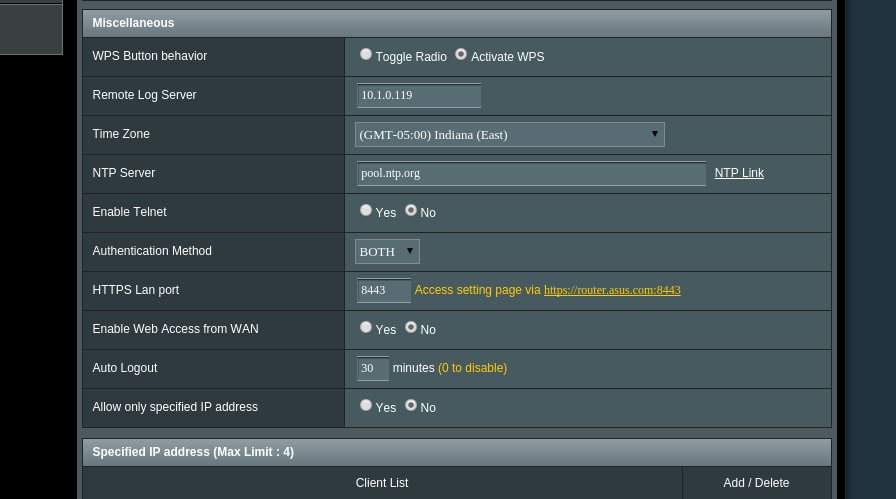
    To setup forwarding syslog to a remote syslog server, you first client on “Administration” in the “Advanced Settings” panel on the left. Then select the “System” tab near the top of the page. Scroll down to “Miscellaneous”. This section is shown below. Enter the IP address of your syslog server (or Splunk server in this case) in the “Remote Log Server” field.

    syslog_asus

    Now lets get down to the business of adjusting our logging level. First you need to ssh into your router.

    Note that it appears that by default the log level is set to 7.

    admin@RT-AC66U: # nvram show | grep log_level
    log_level=7

    Now before you get too excited, I am actually not sure that the main log level adheres to rfc5424. I have yet to find any published documentation from Asus to confirm this. However, according to this guy’s blog, this configuration might be a bit less chatty. Note that there are a few additional settings here which you can play around with. With these settings, I am assuming that 1 is on, and 0 if off. I am still experimenting.

    admin@RT-AC66U: # nvram set log_level=2
    admin@RT-AC66U: # nvram set log_enable=1
    admin@RT-AC66U: # nvram set log_rejected=1
    admin@RT-AC66U: # nvram set log_dropped=1
    admin@RT-AC66U: # nvram set log_accepted=0

    Now lets save our change and reboot

    admin@RT-AC66U: # nvram commit
    admin@RT-AC66U: # reboot

    Note that there also is a vpn_loglevel=3 setting that can be configured via nvram. This setting might be useful to those running a VPN server on their router.

  • Thinklogical Secure Console Server Super Quick Start Guide

    SCS480R_F_B500

    Today we are going to dive into how to setup and use Thinklogical’s line of Secure Console Servers. What I like about these devices (available in 8-, 16-, 32-, and 48- port models) is that they are actually running Linux, so the setup and configuration is a breeze via the command line for anyone comfortable on a Redhat based system.

    Initial Device Setup and Configuration.

    There are two pretty simple ways to connect to your SCS one you have unboxed it and have powered it up.

    The first is via IP. The default ip address of the device is 10.9.8.7. So plug one end of an Ethernet cable into a network port on a laptop or desktop. Plug the other end of this same cable into the first network port on the SCS and configure your workstation so that it has an IP address on the same network as the SCS. In my case I set the IP address of my laptop to 10.9.8.8.  No Netmask or Gateway needed when connected directly. This method enabled me to either ssh directly into the device or connect to it via web browser.

    The second method is via a serial connection to the SCS’s console port. In this case I fired up minicom (hyperterm or putty will do as well if you are running Windows) and configured it to use /tty/USB0, which is the device number associated with my USB to serial converter. If you have an serial port on your laptop you can skip the USB to serial adapter and just plug right into the serial port on your workstation. This method allows you to login directly to the device’s console. In this scenario,  I used a Cisco console cable to connect the two devices together.

    The initial login and password are root/root. It goes without saying that you need to change this password ASAP.

    (more…)

  • Disk I/O Monitoring on the Asus RT-AC66U Router

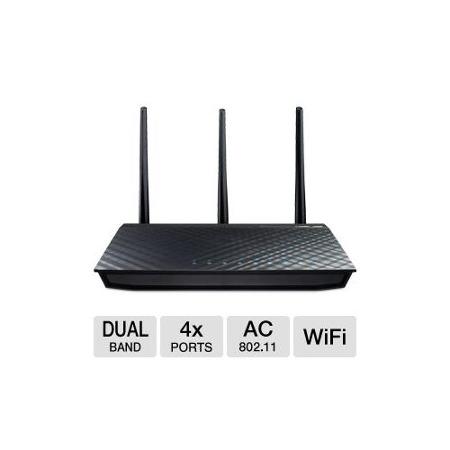
    asus-rt-ac66uThe Asus RT-AC66U, like many home routers that are on the market today, allow you to connect a USB drive to one of its onboard USB ports and share this disk out to your network.  Via the RT-ACC66U, you can share your NAS disk via CIFS or NFS. My configuration has a 1TB unmirrored drive used for temporary scratch storage, and as a network landing area for files that I want to backup.

    Note that this is my 4th article on hacking the RT-AC66U. You can check out my other articles below if you are interested.

    As you must already know, the Asus RT-AC66U runs Busybox, which is a very small but powerful embedded Linux distro. Because of this there are a lot of familiar commands available via the CLI. However, don’t get to comfortable, as this is still a very foreign land.

    Note that this article assumes that you have ssh or telnet working and can log into your RT-AC66U via the CLI.

    As I have stated before, you can use the ipgk command to search for and install packages. In the example below I searched for iostat, but found dstat instead. Either one was fine for my purposes…. at least initially.

    admin@RT-AC66U:/tmp/home/root# ipkg list | grep iostat
    dstat – 0.7.0-1 – dstat is a versatile replacement for vmstat, iostat, netstat, nfsstat, and ifstat

    Now that I know what to install, I need to install it.

    admin@RT-AC66U:/tmp/home/root# ipkg install dstat
    Installing dstat (0.7.0-1) to /opt/…
    Downloading http://ipkg.nslu2-linux.org/feeds/optware/oleg/cross/stable/dstat_0.7.0-1_mipsel.ipk
    Configuring dstat
    Successfully terminated.

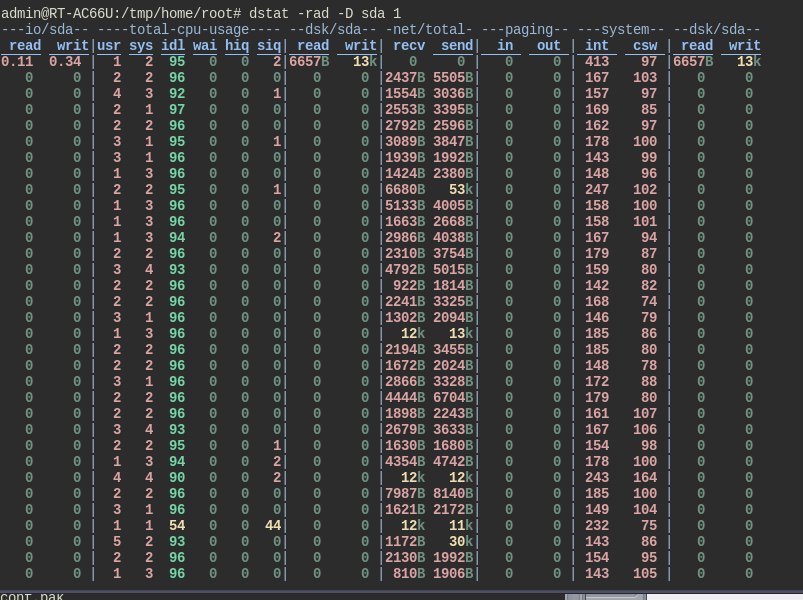
    Now that dstat is installed lets run it. The switches “rad” enable i/o stats and enable disk stats. The “-D” option allows us to specify a disk by name.

    admin@RT-AC66U:/tmp/home/root# dstat -rad -D sda

    The command above output what you see below.

    dstat-screen-shot

    As I mentioned above, dstat is most definitely, a very useful command. However, so far I have not been able to figure out how to get it to display the percentage utilized for a drive, which is rather easy to do with iostat.

  • Visio Network Stencils for Cisco Routers and Switches

    27a8f-6a00e551c39e1c8834015439094705970c-pi

    Looking for Cisco Visio Stencils — Access the entire Cisco Visio template library via the links below. I have tossed in a couple of extra links that should pretty much meet any of your Visio needs.

    Since my last post on Cisco UCS Stencils seems to get a good deal of traffic each day, I figured I would toss another post out into the ether that pertained to Cisco and Visio Stencils:

    Cisco: Visio Stencils

    http://www.cisco.com/c/en/us/products/visio-stencil-listing.html

    Cisco: Network Topology Icons:

    http://www.cisco.com/web/about/ac50/ac47/2.html

    Cisco: Visio Stencil How To Guide

    http://www.cisco.com/c/en/us/products/microsoft-visio-stencils-faq.html

  • HomeLab Adventures: My HomeLab Overview

    motherboard

    Today I am finally going to take the time write an article about my lab. A while back, I had posted an article detailing the FreeNas server that I built to provide shared storage to my virtualization lab. However, today I am going to attempt to dive in deep and write, in at least a bit of detail, about the other components of my lab.

    IMAG0490
    Wall mounted network rack in lab


    Network

    Over the last few years I have collected quite a bit of network gear. My job has given me the ability to take home decommissioned equipment from time to time, and Craigslist has helped me round out my collection. Below is what I currently have deployed. Not everything is powered on currently, as its crazy loud when all those tiny fans are a’screaming.

    IMAG0850
    Wall mounted network rack in office

    The equipment is distributed between my home office, and my lab in the next room over. Everything is racked and stacked in wall mounted telco/network racks. A patch panel, and a number of copper runs connect everything together.

    (more…)

  • Configure the Asus RT-AC66U Router as a Caching DNS Server with Bind

    asus-rt-ac66u

    Introduction

    In this article I am going to walk you through the necessary steps to configure your Asus RT-AC66U as a caching dns server using bind. According to Wikipedia – “Caching name servers (DNS caches) store DNS query results for a period of time determined in the configuration (time-to-live) of each domain-name record. DNS caches improve the efficiency of the DNS by reducing DNS traffic across the Internet, and by reducing load on authoritative name-servers, particularly root name-servers. Because they can answer questions more quickly, they also increase the performance of end-user applications that use the DNS. Recursive name servers resolve any query they receive, even if they are not authoritative for the question being asked, by consulting the server or servers that are authoritative for the question. “

    As you must already know, the Asus RT-AC66U runs Busybox, which is a very small but powerful embedded Linux distro. Because of this there are a lot of familiar commands available via the CLI. However, don’t get to comfortable, as this is still a very foreign land.

    Note that this article assumes that you have ssh or telnet working and can log into your RT-AC66U via the CLI.

    (more…)